How To Optimize Images For Your Website
While working at an ad agency, I learned why it’s always best to establish a size for your images when designing your website. After testing one of our client’s websites, we discovered that their speed performance was a score of 23, which means that their website was operating very slow (click here to test your site). One of the MAIN reasons why was because when the site was first created, the uploaded image was too large (over 1GB). Uploading large images affects site performance. My manager at the time put me on the case and I ended up finding the same problem in three of our other client’s websites. Resizing and optimizing your images for your website is integral to improving your speed condition, so if you already have a website and want to see which images need optimizing, then I recommend following these steps.
My #1 Piece of Advice – when you first create a website, you should already have these steps in your building process, so that you don’t have to go through the hassle of optimizing hundreds of images on your site in the future. Click here to learn how to properly resize and optimize your images if you’re just starting your website.
Tools You’ll Need:
Photoshop
ImageOptim
WordPress Replace Image Plugin
File Types:
Save images in .jpg, .gif, or .png format only.
.pdf, .psd, .tff, and .doc files aren’t web-compatible.
Pagespeed Insight Score Scale:
0-49: slow
50-89: average
90-100: fast
Steps On How To Optimize The Images:
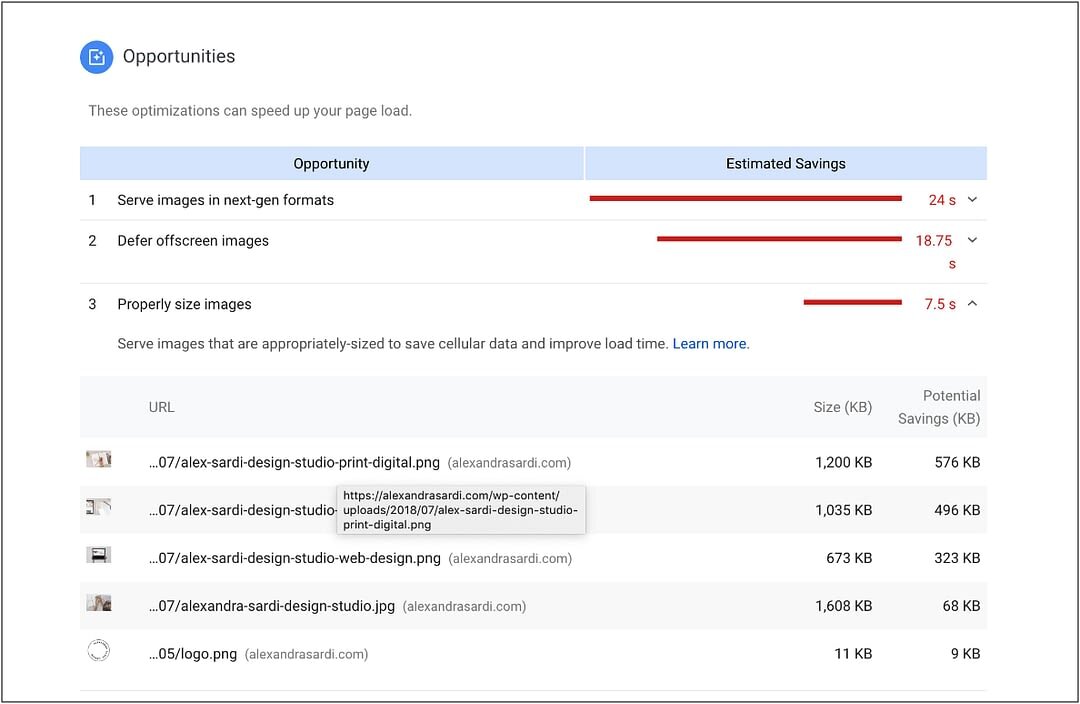
1. Click here to test your site speed. If your site has a score of 0-70, then I recommend continuing with the following steps. If your site has a score of 71-100, then you’re good to go. The screenshot below has a score of 86, which is average speed but since this is an example, we’ll keep going.
2. To find which images are causing your website to slow down, scroll down to the “Opportunities” section under “Properly Size Images.”
3. To download those images hover over the link, copy the link, and open it in a new tab. Now, right-click and “Save Image As”, and download the photos into a folder called “Large Images.” Create another new folder called, “Optimized Images.”
4. I like to do 5 images at a time to speed up the process. Select your 5 images and drag them to Photoshop.
5. Command + Option + Shift + S will allow your image to properly Save For Web.
6. Lower the quality of the image to the point where it still looks nice and crisp (you don’t want to lower it too much to where it gets blurry and pixelated). Make sure your image size is less than 400KB (compare the before/after screenshots below).
*Side note: if you don’t see the size of your image decreasing, try changing the width and height to the proper image size (i.e. W: 800px and H: 600px).
7. Save them to your Optimized Images folder. Repeat this step until you’ve completed it all.
* The Before example shows the image size at 823.1K and the After example shows 96.67K.
8. Download the ImageOptim tool, open the program, and drag and drop all your images onto the area with the down arrow. This tool will optimize your images and automatically save them again into your “Optimized Images” folder replacing the original saved files – you can tell this by seeing the “Size” number decrease.


